Categories
Uncategorized

How to Pick a Keyword Target

How to Pick a Keyword Target

Ashley Kochans | 2.1.21

What is a Keyword Target?

A target keyword is a word or phrase that your audience uses to find you on search engines. Target keywords should be popular terms, but more than anything, they should be relevant to your brand.

Why is it important to define a target keyword for (almost) every page on your website? Because sticking to one target keyword will not only keep your page’s content concisely focused on one topic, but it will also help you rank for that keyword.

How many keyword targets should you have?

With one keyword target, it is far easier to rank. If you attempt to rank for multiple phrases, perhaps you will rank for that keyword, but you won’t rank well.

With one keyword target, it is far easier to rank. If you attempt to rank for multiple phrases, perhaps you will rank for that keyword, but you won’t rank well.

It’s not impossible to rank for multiple keywords. In fact, according to Ahrefs, it is possible to rank one URL for up to ten keyword. As keywords go up in search volume, however, it becomes more and more difficult.

The general rule of thumb? Unless you’re one of the big guys like Google, Facebook, or Amazon, pick one target keyword.

So, if you only get one shot at ranking well on Google, which keyword do you pick? Ideally, your target keyword will be part of your overall keyword strategy. If you don’t have a keyword strategy yet, then follow these simple steps to pick a target keyword for your blogs and web pages.

Need help?

Get your keyword strategy professionally designed with help from an SEO expert.

How to Pick a Target Keyword 

To pick a target keyword, you should rely on a combination of your intuition and data. You started your website for a reason! Whether your site is an endless horse or bouncing cats (true stories), you understand your target audience better than most. Trust your gut!

You’ll also want to empower yourself with some data to back up your best guess. If you’ve got the budget, commit to Ahrefs or SEMRush. These tools take some time to learn, but they are well worth it if SEO is a huge part of your business model.

If you’re just getting your toes wet, start instead by downloading these two (free) extensions for Google Chrome:

Keywords Everywhere will help you find additional search terms that are related to your target keyword phrase. MozBar will help you verify that these terms are the right ones for you to target.

Both tools have a paid version that allows you access to more features, but you can get a lot from the free plan. In order to use MozBar, you’ll have to create an account on moz.com. Once you’ve got your tools set up, pick a target keyword using these four steps.

1. Find a General, Broad Search Term

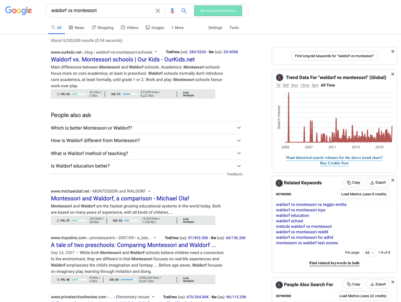
You want to start as general as possible to find the best results. Say, for example, that I’m writing a blog post for a Waldorf School. The most general search term I can think of is “Waldorf”, so I’ll type that into the search bar. Now, pay attention to the drop down suggestions.

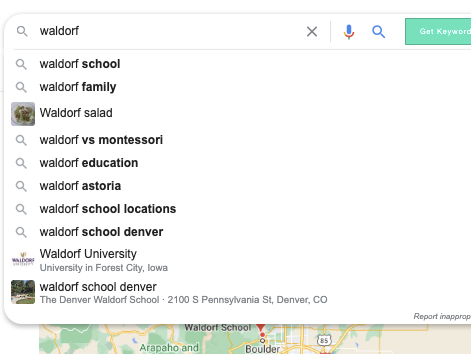
These drop down suggestions are Google’s most frequently searched queries that start with the word “Waldorf”. Notice, that I’m currently in Denver, so my search suggestions include queries that are relevant locally, such as Waldorf School Denver.

I’ll choose the phrase Waldorf vs Montessori, because I’ve got some content ideas around that topic. I’ll analyze this keyword further next step.

2. Find a General, Broad Search Term

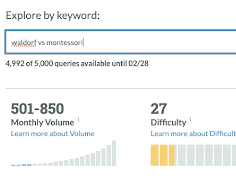
Next, Go into your Moz account to get more information about the term you picked. I’m using the “Keyword Explorer” feature, which you’ll get access to even with the free version of the tool.

Note: Moz gives you a lot of great data about each keyword, but this data is useless without context. In order to know what a “good” keyword is for a particular site, you need to have a general sense of the keywords in that market.

Notice the Monthly Volume and the Difficulty of this keyword. Generally, the higher the search volume and the lower the keyword difficulty, the better. However, depending on your niche, you might need to target terms with low search volume.

Don’t think that everything under 27 is a good difficulty number, or that everything over 500 is a great search volume. It all depends on your niche. The variance you’ll see across markets is why it’s important to compare several keywords before picking one.

3. Compare your Search Term with Similar Terms

I usually test up to 5 keyword phrases before making a decision about my target term. You can look for alternative keywords by using the drop-down method in Google, or by using Moz’s Keyword Suggestions.

If you’re using the free version of Moz, however, you’ll be limited to 10 searches per month. This is where Keywords Everywhere comes in handy. When the extension is turned on, it will show you Related Keywords and “People Also Search for” right on the Google results page.

Once you’ve collected a list of potential keywords, use the data to pick out your favorites. 

4. Make Sure You Can Compete

Google caught on to spammy keyword stuffing years ago. It isn’t enough to be relevant for the keyword in question, you also have to be a credible. Google measures the credibility of a site using a standard called E-A-T. You can see the credibility of a site using your new SEO tools.

Once you’ve picked 3-5 topics that have a good Search Volume and low Difficulty, go back to the Google Search Engine Results Page (SERP). When the MozBar extension is turned on, you’ll find a gray bar with metrics below each result.

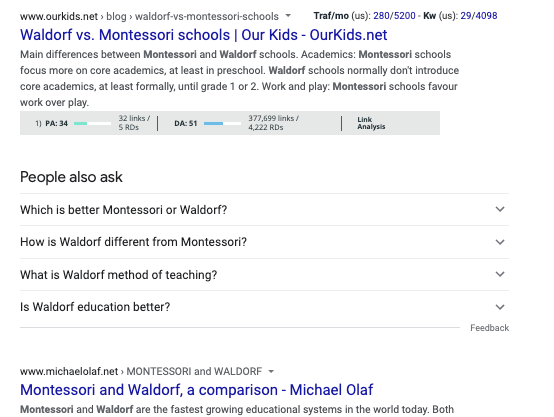
You want to focus on DA (domain authority), which is a measure of a site’s credibility. The biggest influence on domain authority is the number of backlinks to your site. Basically, if you target a keyword, but all the sties that are currently ranking on that keyword have a higher domain authority than you, you have little hope of ranking.

You can check your site’s domain authority by using Link Explorer. After you know what your domain authority is, you can target only those keywords where your site will compete.

In our example above, the average DA of the sites on this search term around 40. If my DA is also in that range, it would be a good search term to target.

Where do you put a target keyword? 

Now that you know how to identify a keyword target, you’ve got to learn where to put them! This isn’t an exhaustive list of all the ways to use keywords, but these are the top 5 places you much include your keyword target:

1. The Title

Your target keyword should always go in the title. However, on websites, it’s important to define what you mean by title “title.”

When an SEO talks about a title, she might be referring to the title as it appears on the Google Search Engine Results Page (SERPs). The SEO title here is the clickable blue text.

You can set this title manually (more on that in another post) or you could let Google automatically pick your title. If you let Google pick the SEO title, it will likely choose the title of the page, which usually appears at the top of the page, like so:

The SEO titles and the page title do not necessarily have to be the same thing, but they should both contain your target keyword.

2. The Meta Description 

The meta description (or in some site builders, the SEO description) is a brief 150 – 160 character description of your page. You should always set a meta description for pages you want to index. Be sure to include your target keywords, as they will show up bolded in Google Search.

3. The URL

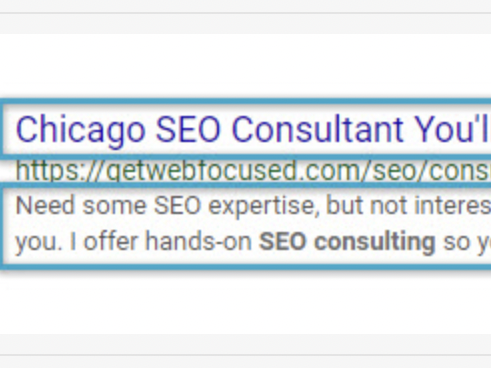
One of the most important places for your target keywords is in your URL (also known as your permalink). Although your typical user isn’t likely to pay much attention to your URL, it is the first thing that search engines see. The best URLs are an exact match of target keywords, like the following post from Empowering Education:

Keep in mind that your site is easy to change, but changing a URL requires quite a bit of work. Don’t include dates or other temporary information in your URL, unless you have a good reason to do so.

4. The Headers

Most websites will have headers that separate large blocks of text and signpost to the user what they are about to read. It is crucial that your target keywords (and some other, related keywords) appear in these headers, like so:

Note: these headers not only need to look different from your regular paragraph text, but they also need the specific H1, H2, H3, or H4 tag in HTML.

5. The Alt-Text

Setting a relevant and descriptive alt-text is important for blind users that use accessibility software to read pages out loud. Because Google’s crawlers are essentially “blind”, they rely heavily on alt-text to understand what your page is about.

Without keyword stuffing your alt-text, try to use 1-3 of your target keywords for each image. The process for setting the alt-text is different for each website builder. Check with your platform’s knowledge base to learn how to edit your website’s alt-text.

Conclusion

If picking a keyword target seems pretty difficult, you’re not alone. Reach out for help with learning SEO, or to hand off the work to an expert!

Need help?

Get your keyword strategy professionally designed with help from an SEO expert.

Categories
Uncategorized

Squarespace SEO

Squarespace SEO

Zack Reboletti |2.17.21

A Guest Post by Zack Reboletti

This post is republished with permission. The original can be found at: https://getwebfocused.com/blog/squarespace-seo/

Three years ago I was talking with a boutique digital marketing firm that was interested in SEO consulting. I really liked the people and believed in their business so it seemed like a good fit. There was only one problem:

Their website was built on Squarespace… (gasp!)

I had been a WordPress guy for a long time leading up to this point, and I was admittedly skeptical about pretty much anything non-Wordpress – especially these “DIY” content management systems that had been popping up.

To make a long story short, I ended up taking on the client, dove into the world of Squarespace SEO and ended up increasing their organic traffic by 282% over the course of a year.

I’ve since worked with several other businesses whose websites were built on Squarespace, and feel comfortable not only working with it but even recommending it to certain businesses (more on that later).

About the optimizations

In an effort to keep this post both organized and thorough, I’m going to cover 15 on-page best practices for search engine optimization (SEO) – both what they are and how to implement them on a Squarespace website.

To give credit where it’s due, these SEO tips were inspired by a blog post written by Sam McRoberts from VUDU Marketing. I don’t know Sam personally, but he’s conducted very public SEO audits for people like Neil Patel and Pat Flynn – two of the most respected internet marketing entrepreneurs out there.

If you have any questions or insights, please don’t hesitate to leave a comment at the end.

Let’s dive in!

1. Customize static URLs

What Is It?

Static URLs refer to web pages that do not change (both the URL itself and the content on the page), as opposed to dynamic URLs which pull content from a database to display on pages, on-demand.

Example Static URL:

http://www.domain.com/category/page-name/

Example Dynamic URL:

http://www.domain.com/sid=349092187362&query=URL

Dynamic URLs have their place (such as filtering and sorting on an ecommerce website), but all of our core website pages should use static URLs. The “customize” aspect of this point means we want to be deliberate about the words and phrases we use in our URLs – basically, everything after the .com in the examples above.

How to Implement It

To create and name new pages, go to Pages → Main Navigation (+) → Page.

Whatever you name your page here will appear in three important areas of your site – each of which is fully customizable via Squarespace:

  1. Navigation Title: what the page will be called in your navigation (such as the main navigation in the header of your entire site).
  2. Page Title: this actually refers to the Title Tag (the text that appears between the <title></title> element of your HTML markup), which is one of the most important on-page factors for SEO.
  3. URL Slug: this is the URL of the web page itself. In most cases, this should match the Navigation Title, but it doesn’t always have to.

In order to create a page hierarchy like this:

  • domain.com/photography/
  • domain.com/photography/wedding/
  • domain.com/photography/family/
  • domain.com/photography/portrait/

Where /wedding, /family and /portrait appear as sub-pages of /photography…

Click the (+) sign again, but this time select the “Folder” option. The folder represents the top-level category which would be /photography in the example above. Then expand the folder and click “Add Page” to add sub-category pages like /wedding, /family and /portrait.

If you want your URL structure to follow this hierarchy (which I usually prefer), just add the top-level category in the URL slug field as pictured above.

Squarespace SEO Best Practice: URLs should be SEO-friendly which means short and intuitive to the content on the page, use hyphens between words, and follow a logical page hierarchy.

2. Redirect old/outdated pages

What Is It?

If you ever need to change a URL on your site (which you inevitably will), it’s important to make sure the old/original URL redirects or “forwards” to the new/updated one.

Why?

So that if people happen upon the old URL, they don’t land on a non-existent web page (typically a “404 Not Found” error) – and instead, get automatically taken to an updated version of the page they were trying to visit.

Additionally, proper URL redirection is important for search engines for a couple of reasons:

  1. It tells them the page has moved and to use the updated page for indexing and ranking;
  2. By extension, it tells them to attribute all external ranking signals (e.g. backlinks) from the old URL to the new one.

The main type of redirection we want to use is a 301 redirect – also known as a “permanent” redirect – which tells search engines that the page has been permanently moved to a new location.

How to Implement It

To set up custom redirects, go to SettingsAdvancedURL Mappings and redirect one page to another using the following format:

/old-url -> /new-url 301

Note the four different elements in the above string:

  1. /old-url the previous URL slug of the page you’re moving
  2. -> a simple arrow made with a hyphen and a greater than sign
  3. /new-url the new URL slug you want the page to reside on
  4. 301 the type of redirect (99% of the time it should be a 301)

In order for redirects to work there is one additional step you may need to take:

  • If the new URL does not already exist (i.e. it’s the first time you’re using it), you need to update the URL slug in the page settings.
  • If the new URL does already exist (i.e. you’re trying to merge two pages), you need to either delete or disable the old URL.

In general, Squarespace makes it easy to implement custom 301 redirects without needing to install additional software or access server files.

Squarespace SEO Best Practice: update URL slugs sparingly, especially if the URL has been live for several months or years. More times than not, you’ll want to 301 redirect URLs to an updated (or relevant) page rather than just retiring it completely.

3. Optimize title tags and meta tags

What Is It?

Title tags (not to be confused with the site title) are the blue “headlines” that get displayed for our web pages in search engine results and are still one of the most important on-page ranking factors used by search engines to determine what a page is about – and in turn, which key phrases it should rank us for in search results.

Meta descriptions are the descriptive text that gets displayed below our title tags in search results. Meta descriptions are no longer a direct ranking factor; however, they still play an important role in click-thru-rate (i.e. the % of clicks on your web page vs. the others around it).

Here’s what we want from Squarespace:

  1. Full control over the text that gets used in our title tags and meta descriptions;
  2. The ability to edit this text on every page of our website (ideally, no two pages have the same title tag or meta description).

How to Implement It

Here’s where you’ll find these SEO settings for three different types of site pages:

  1. For your homepage: go to Settings → SEO. The Search Engine Description field is your meta description and the Homepage Title Format is your title tag.
  2. For your pages: go to Pages → Gear icon (next to a page you want to edit). The Page Title field is your title tag and the Description field is your meta description.
  3. For your blog posts: go to Pages → Blog → Edit (on a blog post you want to edit). The Enter a post title… field is your title tag and the Excerpt field (under the Options tab) is your meta description.

Seems straightforward (and it is), but there are some caveats…

Caveat 1:

Depending on the template you’re using, title tags and meta descriptions get used in other (visible) areas of your web pages. For example, in the popular Bedford template meta descriptions (called page descriptions) get displayed over page banners.

Why is this a problem?

Well, in the example above the text ‘What We Do’ looks great and makes sense for the page; however, it makes for a poor meta description in search results. What you’re left with is the need to make a compromise between trying to write banner text for your web page and a meta description.

Caveat 2:

Blog post headlines get used as title tags – i.e. they must match each other verbatim. Similar to the above point, you’re left trying to write something that serves two separate purposes.

That said, more times than not our headlines work well as our title tags when it comes to blog posts. For instance, even with the ability to differentiate the two I probably end up leaving them the same 9 times out of 10.

Squarespace SEO Best Practice: Keep title tags under 70 characters and use the most important words and phrases at the front (e.g. don’t start with your business name!). Keep meta descriptions under 200 characters and use them to entice people to click through to your page.

4. Specify image filenames and alt text

What Is It?

Image filenames, logically, refer to the name given to an image file. ALT tags refer to short, descriptive text used to describe an image to search engines. They’re also used by assistive screen readers and displayed when images are disabled by a web browser.

While not considered a “major” ranking factor, image filenames and image ALT tags are still considered “content” on a web page, and as such, contribute to both the overall value and topical relevance of the page. They also play a role in Google Image search results.

How to Implement It

There are different types of images you can add to your Squarespace site, such as Image Blocks, Gallery Blocks, Product Images, and more. For the purposes of this post, I’m just going to cover one of the most common ones, Image Blocks.

Image Blocks are used to add images to pages and blog posts – typically within the main body container of a web page and related to the content around it. When you add an image block, there are two tabs that appear in the editor:

  1. Content: while you could just name your image file what you want prior to uploading it, a really nice feature of Squarespace is the ability to edit the filename after uploading it via the “Filename (Optional)” field.
  2. Design: there are six types of image blocks you can use. For an inline image, add your ALT tag under the image as a caption and choose from four different ways to display it (including the option “Do Not Display Caption”). For other types of image blocks, ALT tags can be edited in the same way by using the inline caption (set to “Caption Below”) and then clicking back on the image block you want before saving.

If you neglect to specify an ALT tag, Squarespace will – by default – use the image filename as the text. This isn’t a bad thing, just all the more reason to pay attention to what you name your files.

Squarespace SEO Best Practice: image filenames and ALT tags should be short, descriptive, and relevant to the topic of the page. For example, if your image is a surfer catching a wave in Southern California, don’t name it IMG56217.jpg, but southern-california-surfer.jpg. ALT tags can be a little bit more descriptive and ideally use keywords you’re targeting with the page.

5. Use rel=canonical and meta robots tags

What Is It?

The canonical tag is used to tell search engines that there are multiple versions of a page, and indicate which one they should use for indexing and ranking purposes. This is to avoid issues related to duplicate content (i.e. the same or very similar content appearing across multiple URLs). More times than not, it’s created unknowingly – especially on ecommerce websites.

It looks like this:

<link rel=”canonical” href=”http://domain.com/example-page”/>

The meta robots tag is primarily used to tell search engines which pages you want to appear in search results, as well as whether or not they should follow the links on the page.

It looks like this:

<meta name=”robots” content=”noindex, follow” />

Some content management systems (cough, cough… WIX) make it extremely difficult, if not impossible, to add or edit these tags on individual pages, which can be pretty limiting.

How to Implement It

Canonical Tags

Out of the box, Squarespace implements proper canonical tags on all of our site pages. This is particularly useful for preventing common duplicate content issues related to things like www vs. non-www, http vs. https, and trailing slash vs. non-trailing slash URLs.

The downside is that, because these are part of the core HTML, there isn’t a way to edit them via the dashboard. For the average website, there aren’t a ton of scenarios in which you’d need the ability to do this, but it’s a limitation none-the-less.

Meta Robots

Meta robots tags, on the other hand, can be easily implemented by going to Pages → gear icon (of the page you want to edit) → Advanced.

Say for example you want to prevent (or remove) your Privacy Policy page from appearing in Google’s (or Bing’s) index. Simply navigate to that page and add the following line of code in the Advanced tab:

<meta name=”robots” content=”noindex, follow” />

Another common example would be to prevent (or remove) ‘thank you’ pages that require an opt-in to get to – for instance, a free downloadable report. If you don’t add a noindex meta tag to the download page, people will be able to access it directly from search results without having to enter their email address first.

And one more use-case specific to Squarespace:

“If you are using Squarspace index pages for the landing pages with complex design, make sure to deindex the pages that make up the index page. Since index pages combine multiple pages into one, you may end up having a large number of “half-optimized” pages in Google’s index. To avoid this, add a noindex tag to the component pages and create a unique title and meta description for the index page.” – Tom Bukevicus / Principal / Scube Marketing

Pagination

While technically not a canonical tag or a meta robots tag, pagination is often talked about alongside these elements. Pagination refers to content that spans over multiple pages – for example, /page/2/, /page/3/, /page/4/, etc. of a blog or an ecommerce category.

Google recommends three different options for dealing with paginated content. The first option is “Do nothing” which is basically what Squarespace does. They add a rel=”canonical” tag to all paginated pages pointing back to the first page in the series; however, this is not a “View All” page and there isn’t a way to use rel=”next” and rel=”prev”.

Squarespace SEO Best Practice: review all of your site pages that appear in Google’s index by using the following search string: site:domain.com. If there are any thin, duplicate, old/outdated pages, consider using a meta robots noindex tag to remove them from search results.

6. Edit important HTML elements

What Is It?

HTML is the most widely used markup language for developing a website. One of the biggest benefits of using a CMS like Squarespace is that you can create great looking and functioning websites without the need to edit HTML code directly.

That said, having a high-level understanding of some of the more important HTML elements on a web page – as well as the ability to edit them – is important from an SEO perspective.

In addition to the elements we discussed in points 3, 4 and 5, some of the other things we’ll want to edit include:

  • Heading tags (specifically, <h1> – <h3>)
  • Font styling (bold/italic, bullets, numbers, etc.)
  • Link anchor text (the text that gets used to link to other pages)
  • Nofollow tags (tells search engines not to follow a link)

How to Implement It

Like most modern content management systems, Squarespace uses a WYSIWYG (What You See Is What You Get) editor which allows users to make most of the necessary HTML edits without having to know HTML programming.

Let’s take a look at each of the items I mentioned above:

  • Heading tags: from a standard text block, highlight the text you want to make a heading and choose either “Heading 1”, “Heading 2”, or “Heading 3”. In the HTML markup of the page, this text will be wrapped in either an <h1></h1>, <h2></h2>, or <h3></h3>, respectively.
  • Font styling: from a standard text block, highlight the text you want to emphasize and click either “B” for bold or “I” for italic. This is very similar to most word processing programs, like Microsoft Word.
  • Link anchor text: from a standard text block, highlight the text you want to hyperlink, click the chain link icon and set the destination URL. You can enter the full URL you want to link to – or, select a page on your site from the “Content” tab.
  • Nofollow tags: add a Code Block where the paragraph with your nofollow tag will go. Enter the paragraph text between the <p></p> tags and wrap the following code around your chosen anchor text: <a href=”http://domain.com/” rel=”nofollow”></a> (replacing “domain.com” with the URL you want to link to). Click “Apply”.

Squarespace SEO Best Practice: use header tags and font styling to add priority and emphasis to your content. Make sure there is only one Heading 1 on a page and use Heading 2’s and Heading 3’s logically, where a Heading 2 represents a bigger point and Heading 3’s serve as sub-points.

7. Review/refresh XML sitemap

What Is It?

XML sitemaps are a “behind-the-scenes” website file meant to help search engines find, understand and prioritize the pages of your website for crawling and indexing purposes.

The more dynamic your website is, the bigger the pain it becomes to keep this file up-to-date, which is why Squarespace creates and maintains this file for us. For example, if you add or delete a page from your site, it should automatically be added or removed from your XML sitemap.

How to Implement It

The good news is that there isn’t anything you need to do here. Squarespace comes with a well-formatted XML sitemap as soon as you become a paying customer (note: sitemaps aren’t available to trial sites).

You can view your sitemap anytime by adding /sitemap.xml to the end of your website URL, like this:

http://www.domain.com/sitemap.xml

The downside is that editing your sitemap isn’t possible with Squarespace. For professional SEOs, this can be frustrating as there are certainly instances in which we want the ability to make manual updates.

For example, in point 5 above we discussed using the meta robots noindex tag to prevent certain pages from appearing in Google’s index. It is generally considered best practice to remove these pages from your XML sitemap, which isn’t possible with Squarespace.

That said…

“There is a way to manually refresh your Squarespace sitemap. If it’s out of date, verify the sample URLs in your sitemap and compare them against URLs on your site. If you see discrepancies, contact support and ask to manually refresh it. They will be glad to do it.” – Tom Bukevicus / Principal / Scube Marketing

While it’s frustrating we can’t update it ourselves, I think Squarespace’s built-in sitemap is still significantly better than the average website’s.

Squarespace SEO Best Practice: submit your XML sitemap to Google Search Console (and while you’re at it, Bing Webmaster Tools) via Crawl → Sitemaps → Add/Test Sitemap. Enter “sitemap.xml” (without the quotes) in the field next to your domain and click “Submit”. Give it a few weeks, then check back to ensure that the large majority of your Submitted pages are Indexed.

8. Set up a blog (and start blogging)

What Is It?

A blog is a “must” for pretty much any business these days, as it’s the easiest way to consistently create and promote new quality content on your website. Without one, many websites would remain static which wouldn’t give people (or search engines) much reason to return back to them.

There are two big features Squarespace offers here:

  1. Easy set-up on your root domain (e.g. domain.com/blog); and
  2. Basic features like categories, tags, recent posts, commenting, etc.

How to Implement It

Blog Page

The first thing you need is a blog page. This is the main landing page of your blog (e.g. domain.com/blog) that typically lists all of your blog posts in chronological order.

Most Squarespace templates come with a demo blog page already added under Pages → Blog. You can either start editing that, or you can add a blog page yourself by clicking Main Navigation (+) → Blog.

Similar to standard site pages, you can edit the Navigation Title, Page Title, Description, URL Slug, and more by clicking the gear icon.

Blog Post

With just a couple clicks of the mouse, you’re ready to create your first blog post. This is an individual entry on your blog (e.g. domain.com/blog/welcome-to-my-blog), usually covering a specific topic.

To get started, simply click on your blog page, then click the (+) to Add Post. Squarespace has really good documentation on all the various features of the blog; however, there is one small point I want to make before you start publishing. By default, Squarespace puts the published date in your URLs like this:

http://www.domain.com/blog/2017/10/8/welcome-to-my-blog

Unless you’re creating a news site and/or plan to regularly publish time-sensitive content, I recommend removing the date from your blog post URLs to keep them more “evergreen” and reduce their overall length.

Post URL’s can be customized under the Options tab of the post editor – and, you can update the default setting under Settings → Blogging → Post URL format (remove %y/%m/%d/ and keep %t).

Squarespace SEO Best Practice: Regularly publish great content that answers your prospect’s top questions using keyword research. I highly recommend reading Orbit Media’s post on Blogging SEO and mine on What Makes a Good Keyword before you start (or spend any more time) writing.

9. Improve site speed

What Is It?

With page speed becoming an increasingly important ranking factor, not to mention conversion factor, it is quite literally one of the most important aspects of your website and its ability to grow your business online.

In general, Squarespace templates employ modern HTML and CSS best practices, minimize the use of unnecessary javascript and other code bloat, and load relatively quickly on both desktop and mobile devices;

However, because you are required to use Squarespace servers and hosting, and because there are many aspects of the core site code that can’t be touched, you are limited in what you can do to improve your page speed further.

How to Implement It

The biggest thing you have control over is image file size, so that’s what we’ll focus on here. There is a LOT of different advice out there on this topic – both from Squarespace and across the web – but I’m going to distill it down for you.

Prior to uploading images to your site, you want to first resize them (in terms of dimension) and then compress them (in terms of quality).

Using Photoshop:

  1. To resize: open your file and go to Image → Image Size and set the width to 1500 pixels and resolution to 72 pixels/inch.
  2. To compress: go to File → Export → Save for Web and select JPEG as your file format and High as your quality.

Using free, online tools:

  1. To resize: visit picresize and go to Browse (to upload your file) → Continue and set the custom size width to 1500 pixels (for banner images) and 750 pixels (for inline image blocks).
  2. To compress: set the JPG Quality to Better, then click I’m Done, Resize My Picture and Save to Disk on the next page.

I just snapped a picture from my phone and opened it on my computer. The original file was 4356px X 2904px and 6.60MB, which is HUGE! With just a minute of work using the free online tool above, I got it down to 1500px X 1000px and 196KB.

With either method, the difference in image quality should be indiscernible to your average website visitor.

Squarespace SEO Best Practice: JPG images typically compress 5x better than PNG images, so unless you absolutely need a transparent background for something (such as your logo), it’s best to save pictures as JPG.

10. Review schema markup

What is It?

Schema markup refers to code that can be added to your web pages to help search engines better understand the meaning behind various elements of your website and enhance the way your web pages appear in search results. Common examples include star ratings and reviews, event schedules, prices, and thumbnail images.

While schema markup is not a direct ranking factor, it can increase your CTR from search results and potentially even reduce your bounce rate – both of which can impact your rankings.

How to Implement It

Out of the box, Squarespace automatically implements the following types of schema markup:

Some of the properties for the first four schema types get populated from the Settings admin, and the Product and Event schema get added via those page settings in Squarespace (Pages → Main Navigation (+) → Products and Events).

In each case the options are limited in terms of the properties you can fill out, and as far as I can tell you cannot remove or overwrite the default markup.

Other methods for implementing schema markup on your website (such as Google Tag Manager and Data Highlighter) are fairly advanced topics and outside the scope of this post. I’ll be honest in saying that for most Squarespace users, time and energy will be better spent on other things.

Squarespace SEO Best Practice: review your existing schema markup any time using Google’s Structured Data Testing Tool. Note that you can see what types of schema markup other websites (such as your competitors) are using with this tool as well.

11. Test on mobile devices

What is It?

Since mid-2015, more searches are conducted on mobile than desktop, with the gap becoming wider and wider ever since. Additionally, Google will be switching to a mobile-first index soon, which means that the mobile version of your site’s content will be used for ranking purposes.

There are three different ways you can make a site mobile-friendly:

  1. Responsive web design
  2. Dynamic serving
  3. Separate URLs

Google’s recommended approach is the first one, responsive web design, which means the same HTML code is used to display your web pages, regardless of screen size. In other words, the elements of your website adapt and adjust to fit the device it’s being viewed on.

For anyone creating a new website, using responsive design is a no-brainer.

How to Implement It

With Squarespace as your CMS, there shouldn’t be much to “implement”. All Squarespace templates are responsive out of the box, which means your website should look great on any device type or screen size.

That said, the more you customize your template, the more likely you are to create issues with your mobile experience. Not to worry though; there are two simple tools you can use to review how your website gets displayed on mobile:

  1. Google’s Mobile-Friendly Test: enter a page URL and click “Run Test”. In less than a minute, Google will review your page and let you know if it’s mobile-friendly and provide diagnostic information if there are any issues.
  2. Squarespace’s Device View: hover over the site preview pane and choose from phonedesktop and tablet view to see how your site looks on each device type.

Whether you’re creating the site yourself or working with an agency, it’s important to use the tools above throughout the development process and/or any time you make a significant change to your template.

Squarespace SEO Best Practice: Ask yourself the following questions about your mobile site: Are menus easy to navigate? Is text easy to read? Are buttons easy to click? Are form fields easy to fill out? Are there intrusive interstitials? Do I have to pinch, scroll (horizontally), or zoom in/out excessively? Here’s a complete mobile SEO checklist.

12. Integrate social media

What Is It?

The impact of social media on search engine rankings has been a hotly debated topic for as long as I’ve been in the SEO game.

While social media signals (links, mentions, Likes, etc.) may not be a direct ranking factor in Google’s algorithm, they still play an important indirect role in your SEO efforts. Said more eloquently in a post from Search Engine Journal:

Even if social media isn’t a direct Google ranking factor, it is one of the best ways to promote content and be found online. Which is, ultimately, what SEO is all about.

There are a couple of ways in which Squarespace can support our social media marketing efforts:

There are a couple of ways in which Squarespace can support our social media marketing efforts:

  1. By linking directly to our social media profiles;
  2. By making it easy for people to share our content on their social media profiles.

How to Implement It

Adding social icons

Start by connecting your social accounts to your Squarespace site via Settings → Connected Accounts → Connect Account.

Select the first profile you’d like to connect (for example, Facebook), login to your account and follow the prompt to give Squarespace access. You’ll be directed back to a Settings box in Squarespace where you can enter your Profile URL.

Note: by default, it auto-populates your personal profile URL, so if you’d prefer to link to your business profile, change that now.

Do this for all of the social networks you’re active on and would like to promote.

Most Squarespace templates will automatically add social icons with links to your profiles in the footer of your site; however, for templates that don’t add them automatically – or if you want to add them to other areas of your site – you can use the Social Links Block.

“Be deliberate about adding icons to your social networks. Any click on any social icon is an exit from your website, so make sure you’re sending that visitor to a place where you are truly engaging with an audience and adding value through content. Here’s a quick guideline for which social icons to add to your Squarespace site.”

-Andy Crestodina / Co-Founder & CMO / Orbit Media

Adding social sharing buttons

Start by selecting the social networks in which you’d like people to share on via Settings → Marketing → Share Buttons.

Social sharing buttons are automatically displayed on collections pages, such as blogs, galleries, products, etc., depending on the template.

Some templates display share buttons behind a Share link (which to be honest, I’m not crazy about), and others display the buttons directly on the page and offer advanced styling options.

Lastly, Squarespace offers options to push content from your site to your social networks (for example, when you publish a new blog post), and pull content from your social networks into your site. Instructions are detailed in the first ‘Related documentation’ link below.

Squarespace SEO Best Practice: leverage social media for link building by promoting high-value content from your blog, using relevant hashtags in your messaging, and connecting with influencers in your space. Simply put: the more visible you are on social media, the more opportunities you’ll create for gaining external inbound links.

13. Create a custom 404 page

What Is It?

404 error is an HTML status code that means the page you were attempting to visit could not be found by the website’s server. They are generally created when web crawlers follow a link to a page that no longer exists.

Some of the most common causes include:

  • Deleting a page from your website without redirecting the old URL to a new one;
  • Changing the URL of an existing page without redirecting the old URL to a new one;
  • Another website linking to a non-existent page on your website (a typo, for example);
  • A user mistyping your page URL in their web browser’s address bar.

Any website that has been online for more than a couple years will undoubtedly create 404 errors at some point – and one way or another, some of your site visitors will land on them.

Because of this, it’s important to serve a custom 404 page in order to help them quickly find what they were looking for instead of leaving your site.

How to Implement It

Creating a custom 404 page in Squarespace is simple. Start by creating a page as you would any other under Pages → Not Linked (+) → Page.

Note: you want the page to appear under the “Not Linked” section so it doesn’t get added to your navigation.

From there you can customize the page however you want, keeping in mind that it should be both personable and useful. Consider adding the following:

  • An image relevant to the page not being found (you can have fun with this!);
  • A message letting people know the page doesn’t exist (again, feel free to be clever here);
  • Suggest pages for them to visit (e.g. popular blog posts, a list of products or services, your contact page, etc.);
  • A search bar so people can quickly search what they’re looking for.

Once you’re happy with your page, save it and go to Settings → Advanced → 404 Error / Page Not Found. Simply select your page from the drop-down and you’re all set!

To double-check it, enter a non-existent URL into your web browser, like domain.com/asdfasdf and you should see your new custom 404 page.

Squarespace SEO Best Practice: while a custom 404 page gives visitors a better user experience than the default ‘404 – Not Found’ page, you still want to limit them as much as possible. Keep an eye on 404 errors regularly via Google Search Console under Crawl → Crawl Errors. Click each one, review the Linked From tab, and determine whether it’s a link that can be fixed or if you should 301 redirect the page.

14. Update internal links

What Is It?

Any time you change a URL on your site, all of the links to that page from other areas of your site break. Fortunately, custom URL redirects (discussed in criteria 2 above) solve this problem.

That said, it’s still ideal to update internal links to the new/moved page for two reasons:

  1. Redirects can slow down your site – especially at scale, over time;
  2. A small amount of link equity or “authority” from the linking page gets lost in the redirect.

For smaller websites, it’s fairly easy to update internal links to a new URL manually. For larger sites (e.g. with hundreds of blog posts), however, finding and updating dozens or hundreds of internal links can be a real pain.

How to Implement It

As far as I know, Squarespace does not offer any form of automatic link management. Fortunately, most people and businesses that use Squarespace are not creating massive websites, so manually updating internal links on occasion shouldn’t be a huge hassle.

If you do happen to have more pages on your site, you can use Google Search Console’s Internal Links Report to help identify all the pages on your site that link to the one you’re moving.

You’ll still need to go into each page and update the links manually, but at least the first step (finding them) is relatively easy:

  • From your Google Search Console property, go to Search Traffic → Internal Links.
  • Enter the URL of the page you’re moving (i.e. everything after .com/) and click Find for a list of pages on your site that link to it.
  • If you have a hard time finding the link on the page, simply right click, View Page Source and use Control+F to search for the URL.

Squarespace SEO Best Practice: try to avoid creating redirect chains, where one URL redirects to another, which redirects to another, etc., before landing on the final destination page. If you change a URL more than once, make sure the original URL redirects to the final one instead of an intermediary one (update via Settings → Advanced →URL Mappings).

15. Allow user-generated content

What Is It?

User-generated content refers to content – most commonly in the form of text – that is created by users, submitted through your website, and displayed on your live web pages.

There are a lot of benefits to hosting user-generated content on your website, especially in the form of blog comments and product reviews. From an SEO perspective, user-generated content can:

  1. Serve as a valuable quality signal to search engines;
  2. Increase the amount of original, relevant content on your web pages.

The process of allowing user-generated content requires programming; of course, the main reason we use a CMS like Squarespace is to avoid the need to be programmers!

How to Implement It

Blog Comments

To enable comments on your blog, go to Settings → Blogging → Comment Settings.

I recommend checking everything except Allow Anonymous Comments. Leaving this unchecked will require people to log in via Squarespace, Google+, Twitter, or Facebook before leaving a comment which will greatly reduce the number of spam submissions you receive.

Two settings you might consider testing:

  1. Require Approval: If you’re just starting to allow comments, I recommend manually reviewing and approving comments as they come in. Over time, if you find that you’re able to approve the large majority of comments, you may consider letting comments get published without approval.
  2. Auto-Disable Comments Default Value: If you’d like to disable comments on posts after a set period of time (say, 1 – 3 months), you can set that here. For instance, if you publish a lot of timely blog posts, it’s unlikely that people will be contributing meaningful comments months or years after the fact.

To manage blog comments, go to Home → Comments (note: you’ll only see this option after checking Enable Comments Globally from the previous step).

Click the Unmoderated tab to see comments requiring moderation. The checkmark will approve a comment and the trashcan will delete it. Once you approve a comment it will move to the Approved tab where you can choose to leave a reply.

If you’d like to be notified (or not) of new comments, hover over your avatar in the account dashboard, select Edit Profile and set your “Comment Subscription” either ON or OFF.

Product Reviews

Product reviews are extremely common on ecommerce websites, and the right kind of reviews can have a big impact on conversions. This is in addition to the more direct SEO benefits mentioned above.

Unfortunately, the process for adding product reviews to your Squarespace site isn’t as straightforward as the blog commenting features above. In fact, Squarespace doesn’t offer product review functionality by default – rather, they require integrating with one of the following four third party solutions:

  1. The first three options – DisqusFacebook Plugin and Comment Box – are commenting plugins and don’t provide the functionality to rate a product.
  2. The fourth option – Rating Widget – is the opposite; it lets users select a star rating, but doesn’t offer the functionality to leave a text-based review.

Of the four solutions provided, the only one I’d play with would be the RatingWidget. It’s easy to implement and adds some social proof to product pages;

However, in order to get rich snippets (stars and reviews) in search results, you either need to upgrade to the Business plan ($7.99/mo) or manually insert a small JSON-LD code snippet on each of your product pages.

Squarespace SEO Best Practice: be sure to always respond to blog comments! Whether in the form of a question, an opinion, or a compliment, consistently responding to blog comments goes a long way towards building relationships with readers and prospective customers.

Final thoughts on Squarespace SEO

If I had to answer the question, “Is Squarespace good for SEO?” in one word, it would be YES.

While there are some minor limitations here and there, the ease with which you can implement and customize the large majority of on-page SEO best practices makes it a great platform for a lot of business types.

A few scenarios in which Squarespace might not be the best fit:

  1. Large brands requiring complete creative control over their design;
  2. Ecommerce stores with hundreds of products and/or mid-six-figures + in revenue;
  3. Websites requiring more sophisticated user functionality.

For any SEO consultants or agencies hesitant to take on a Squarespace client, fear not! I’ve worked with multiple businesses on Squarespace and have had a relatively smooth process optimizing their websites and getting great results for them.

Regardless of which side of the business you’re on, I hope this post helps your optimization efforts!